1. Handprint Bats, Monsters, Ghosts, and More
Turning your child’s handprints into cute Halloween keepsakes is easier than it sounds. With some card stock, scissors, glue and a few other supplies, your child’s hands can actually serve as the blueprint for a number of classic spooky staples, including bats, monster puppets, ghosts, spiders and more. You can string the finished products up along the walls, tack them to windows and doors, or simply have them lying on tables around the house. Wherever you put them, they’re guaranteed to add a burst of Halloween spirit to every corner and nook.
Courtesy of Simple Everyday Mom
Materials:
- Colored card stock (purple and black for bats; green, red, black and assorted colors for monsters; black and red for spiders, etc.)
- White card stock
- Googly eyes
- Pencil
- Glue stick
- White-out
- Scissors
- Markers (black and any other colors you want)
- Popsicle sticks
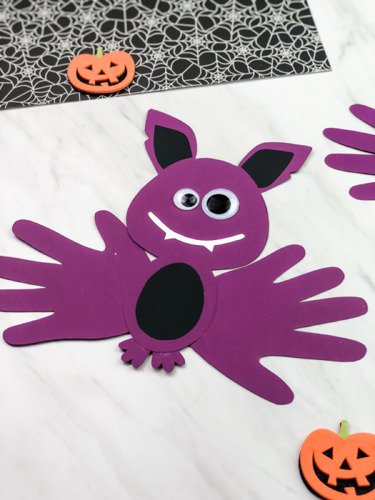
Instructions for a bat:
- To make the bat, start by drawing out its individual body parts on purple card stock (or, if your child is young and needs a little help getting their lines right, you can simply print out Simple Everyday Mom’s free bat template on colored card stock after entering your email at the bottom of the page). If drawing and cutting on your own bat, you’ll need: two identical/symmetrical ears, two feet, a face and a body. (We’ll save the wings for the next step.) Don’t worry about perfection — remember, this is supposed to be fun! — but you can take a look at the photo above to get an idea of the relative shapes and sizes.
- On a separate piece of purple card stock, help your child trace both of their outstretched hands. (These will be the wings.)
- Cut out all the individual parts of the bat and lay them in front of you.
- Begin to assemble the body together by glueing the ears behind the head (so they’re sticking up), the wings to the body, the head to the body and finally the feet to the body.
- You can glue smaller concentric cutouts of the body and ears from black card stock to provide some contrast (pictured above), or have your child color them in with black marker.
- Using white-out or white paint, draw a smile on your bat’s face with two pointy teeth poking out on other side.
 Courtesy of Crafts by Amanda
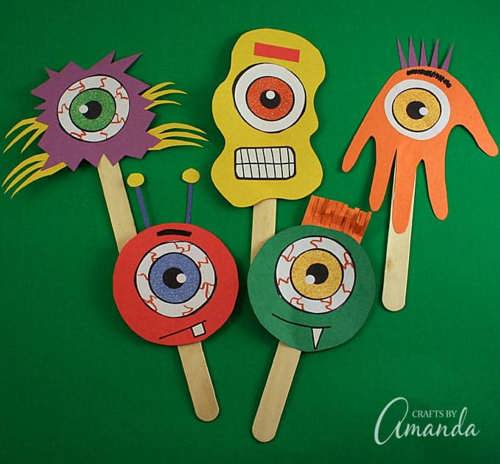
Instructions for a monster popsicle:
- Trace your child’s handprint (or have them trace their own) on their choice of card stock. Their fingers can be splayed, side by side, in a “Vulcan salute” or any other configuration.
- Have your child draw monster faces within the outline of their hand using different markers.
- Cut out the handprint and affix it to a popsicle stick.
Instructions for a ghost:
- Trace your child’s handprint (or have them trace their own) on white card stock. Their fingers can be splayed, side by side, in a “Vulcan salute” or any other configuration.
- Have your child draw two black eyes and a black mouth near the “heel” of their hand within the outline on the white card stock.
- Cut out the handprint and affix it to a popsicle stick or a black card stock background.
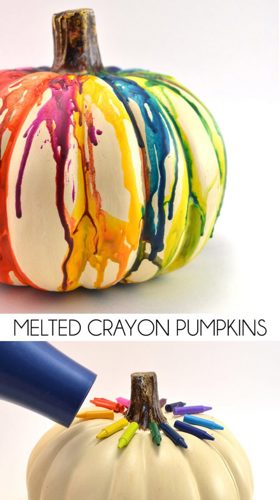
2. Melted Crayon Pumpkins
Orange and black dominate the Halloween color scheme, but why not change things up with a colorful rainbow pop? Using a white pumpkin or gourd as a blank canvas, this activity is about as simple as you can get, and a great way to use up any old crayons you have lying around the house. Kids love to watch the crayons melt and trickle down the sides of the pumpkin, and if we’re honest, it’s pretty cool to observe for all the grown-ups involved, too. While the end result is pretty enough to place anywhere you need a bit of brightness, you can even take it one step further and turn it into a candle holder by carving out a hole around the stem that’s just big enough for you to stick a candle in.
Materials:
- White pumpkin (you pick the size)
- Crayola crayons
- Clear tacky glue
- Blow dryer
- Garbage bags or newspaper for your work surface
- Optional: glitter
Instructions:
- Unwrap your crayons (be sure to use Crayola, since they melt the best).
- Split the crayons in half, using a knife or scissors for a more exact cut.
- Using tacky glue, stick about 16 crayon halves around the stem of the pumpkin in a circle, arranging the colors into whatever pattern you wish.
- Wait a few minutes for the glue to dry.
- Blow-dry the crayons and watch them melt and dribble down the pumpkin’s surface.
- Add glitter (if you want) before the melted crayon wax hardens again.
Courtesy of The Printables Fairy
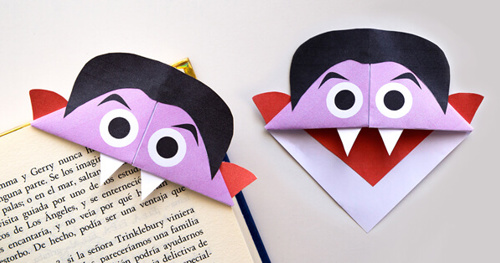
3. Origami Corner Bookmarks
There are few better ways than a good Halloween book to get your spook on, and this easy origami craft can make the act of saving your page both festive and fun. To make the process as hassle-free as possible, use one of the printable templates below from The Printables Fairy and then follow the folding instructions to transform the sheet of paper into a vampire, fanged cat, zombie or more. We’ve included five templates for you to choose from, plus five of our favorite Halloween books for K-2 kids that you can pull off the shelf for storytime.
Materials:
- Vampire bookmark template
- Zombie bookmark template
- Frankenstein bookmark template
- Black cat bookmark template
- Skull bookmark template
- White paper (not card stock, which is too thick to fold)
- Scissors
- Glue
- Colored pencils and markers
Instructions:
- Print out your template of choice (using color ink) on white paper.
- Cut along the line so you have a square.
- Follow the folding instructions in the links where you downloaded the template. (The Printable Fairy provides video tutorials as well.)
- Draw any additional details with marker or colored pencil, if you wish.
Spooky book recommendations:
- The Little Kitten by Nicola Killen
- Bone Soup: A Spooky, Tasty Tale by Alyssa Satin Capucilli, illustrated by Tom Knight
- Halloween Good Night by Rebecca Grabill, illustrated by Ella Okstad
- The Happy and Heinous Halloween of Classroom 13 by Honest Lee and Matthew J. Gilbert, illustrated by Joelle Dreidemy
- Room on the Broom by Julia Donaldson, illustrated by Axel Scheffler
Courtesy of Frogs Snails and Puppy Dog Tails
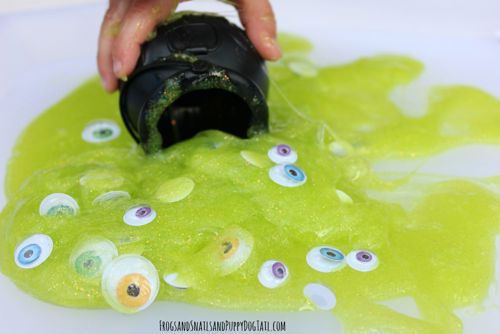
4. Homemade Slime
Slime — it may be icky, but the recipe is as easy as you can get and your kids will love having it around. In fact, we might argue that there’s even something wonderful about letting your kids make and play with slime, and not just because there’s a built-in science lesson waiting for you to teach them. Slime is also an amazing tactile experience that can help them feel calm (slime stress ball, anyone?). This recipe might be a mess, but it’ll last for months and keep your kids entertained through all the post-Halloween holiday madness.
Materials:
- At least 2 bottles of Elmer’s Washable Glitter Glue
- Liquid starch
- Googly eyes or plastic insects
- Large bowl
- Spoon
- Newspaper or garbage bags for your work surface
Instructions:
- Add two bottles of glue into your mixing bowl (stick to one color at a time).
- Measure out 1 cup of liquid starch and add to the glue, stirring with a spoon to incorporate. After using your spoon to fold most of the liquid into the glue, you can use your hands to knead the mixture.
- Continue adding liquid starch until you reach a “slime” texture — firm but stretchy.
- Store in Tupperware with googly eyes or plastic insects.
| Tip: You can make glow-in-the-dark slime by using Elmer’s Glow in the Dark Glue or adding glow-in-the-dark paint to your mixture. |
Courtesy of Easy Peasy and Fun